PowerShell Hardening through Script Signing

Torsten Rywelski
June 30, 2026
⏳ 6 min
Securing the Windows Swiss Army knife
In the world of Windows administration, PowerShell is no longer an optional gadget. It is the operating system equivalent of a Swiss Army knife. Powerful, versatile and available on virtually every Windows system.
Unfortunately, attackers know that too.
My colleague Florian Heinen recently published an excellent article on the strategic importance of PowerShell security. He explains why simply disabling PowerShell is rarely an option and why organizations should focus on controlling and hardening it instead.
"Security is not a product, but a process."
This idea runs through Florian's article and provides the perfect foundation for my deep dive into the practical side of the issue, focusing on script signing as one of the most effective PowerShell hardening measures.
Why script signing matters
PowerShell script signing adds a digital signature to a script and allows Windows to verify who created it and whether it has been modified since.
From a security perspective, this provides several benefits by:
• Verifying the author of a script,
• Detecting unauthorized modifications,
• Supporting trusted execution policies,
• Reducing the risk of malicious script abuse.
It won't stop every attack. Hardening rarely works that way. But it raises the bar significantly and helps turn PowerShell from a potential security risk into a controlled administrative tool.
Manual script signing with PowerShell
Let's start with the manual approach. I'll show you how to sign a PowerShell script using PowerShell itself and then how to streamline the process with VS Code.
For all examples listed below, I'll assume that you already have a Code Signing certificate and that it is available in your local certificate store.
The Steps to follow:
Open a PowerShell session and store your Code Signing certificate in a variable:
$cert = (Get-ChildItem Cert:\CurrentUser\My -CodeSigningCert)[0]
To verify that the certificate was loaded successfully, make sure the $cert variable now contains your certificate, as shown below:

Now for the actual signing process. In the following example, the file c:\Temp\Shiftavenue.ps1 is digitally signed:
Set-AuthenticodeSignature -Certificate $cert -FilePath ‘c:\temp\shiftavenue.ps1’ -HashAlgorithm "SHA256" -TimestampServer "http://timestamp.digicert.com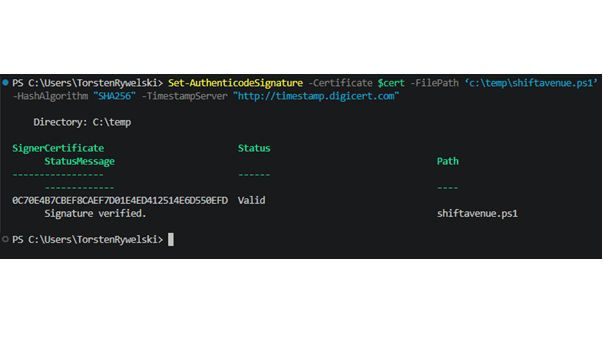
If you open the script .ps1 afterwards, you'll notice a rather impressive block of cryptic characters appended to the file. That's your digital signature block.
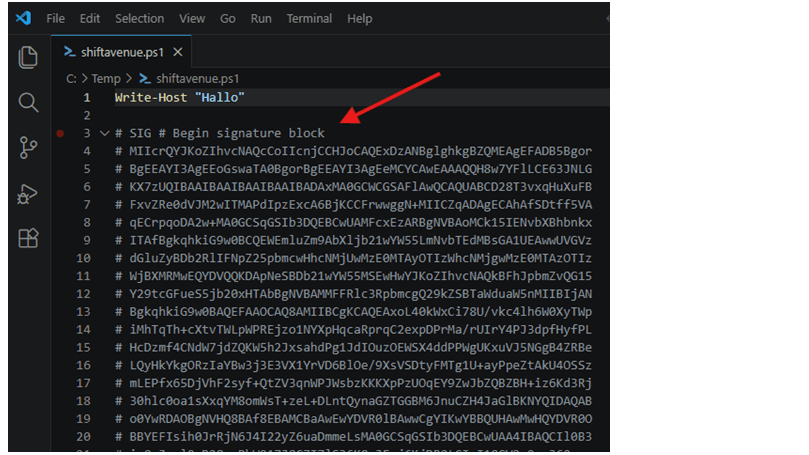
That's it, now the PowerShell script is signed with your personal certificate!
To ensure the signature remains valid even after the certificate expires, you should use a TimeStamp Server, just like in the example.
You'll also need to make sure that the issuing Certificate Authority is trusted on every system where the script will be executed.
⚠️ There is one catch: every time you modify the script, you'll need to sign it again.
That's manageable at first. After the twentieth change, it starts getting old. Fast.
Let's look at two ways to make the process less painful.
Automating script signing in VS Code
Open a VS Code terminal and run the following command:
Notepad $Profile
VS Code will open Microsoft.VSCode_Profile.ps1. If the file doesn't exist yet, you'll be prompted to create it.
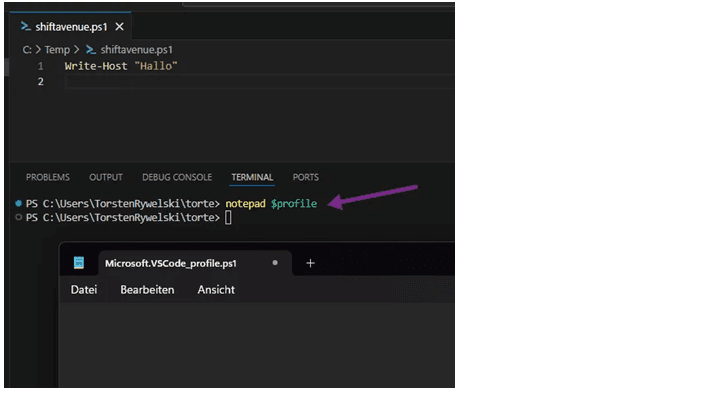
Add the following lines to the profile file and save your changes.
Write-host "*** Register additional commands ***" -ForegroundColor DarkGreenRegister-EditorCommand -Name SignCurrentScript -DisplayName "Sign Current Script" -ScriptBlock {
$cert = (Get-ChildItem Cert:\CurrentUser\My -CodeSigningCert)[0]
If ([string]::IsNullOrEmpty($cert)){
Write-host "No CodeSigningCert found. Signing will not work!" -ForegroundColor Red}
$currentFile = $psEditor.GetEditorContext(). CurrentFile.Path
Set-AuthenticodeSignature -Certificate $cert -FilePath $currentFile -HashAlgorithm "SHA256" -TimestampServer "http://timestamp.digicert.com"
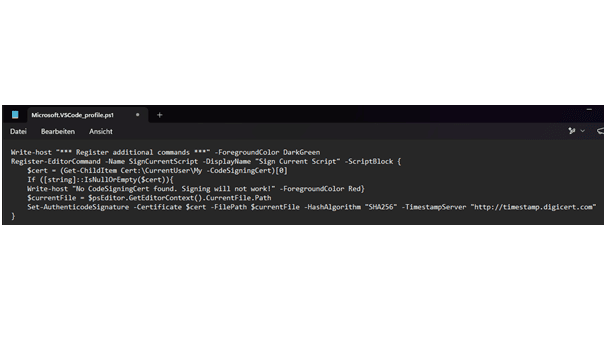
Restart VS Code so the updated profile can be loaded.
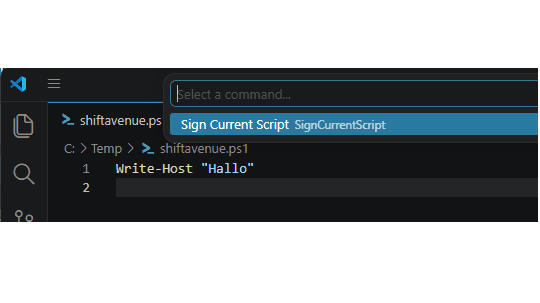
Press ALT + SHIFT + S and you'll see the command we just registered. Execute it and the currently opened PowerShell script will be signed automatically.
Honestly? Still too many clicks, right?
In day-to-day administration and development work, small interruptions add up quickly. If a task has to be repeated over and over again, chances are people will eventually skip it.
The 1-Click Solution: shiftavenue VS Code Sign Extension
To make the process easier and faster, I wrote a small VS Code extension that reduces script signing to a single click.
How to get the tool
- Open VS Code.
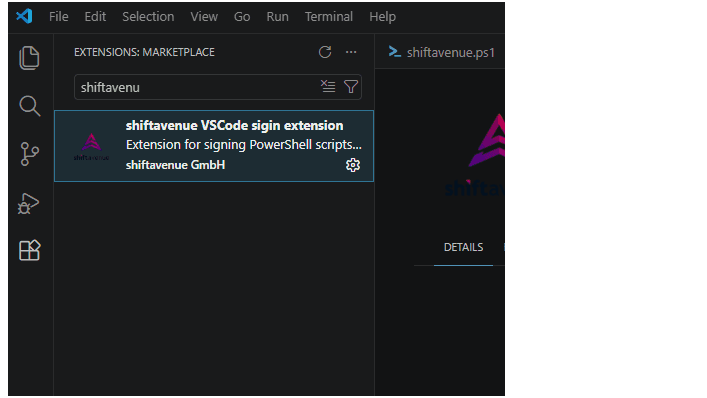
- Go to the Extensions browser (or press CTRL + SHIFT + X).
- Just search for shiftavenue.
- Click install and enjoy!
You can also download the extension from the following marketplaces:
- Visual Studio Marketplace (Visual Studio Code)
- Open VSX Registry (VSCodium and compatible editors)
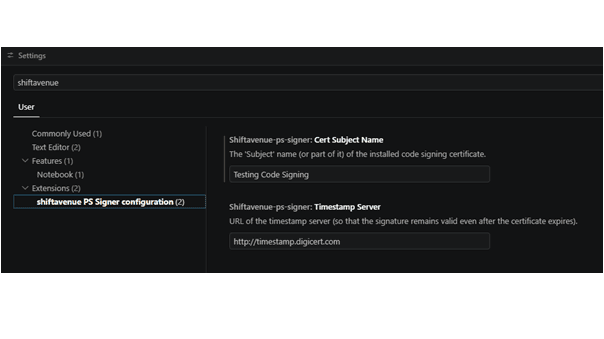
Configure your Signing Certificate
Before the extension can sign scripts, it needs to know which certificate to use. Fortunately, that's a one-time configuration:
- Open the settings from the menu: File – Preferences – Settings (or CTRL + ,)
- Just type shiftavenue again in the search field above
- Now enter the name of your signing certificate there – done
And this is how ingenious it looks in everyday life:
Once you've opened a .ps1 file in VS Code, the magic happens: a small shiftavenue icon appears in the top right of the Editor Title Toolbar, as shown below.
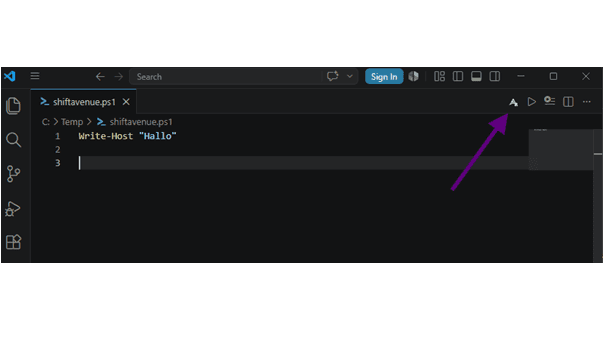
No more keyboard shortcuts, no more searching in the command window. A single click on the icon is all it takes to get your PowerShell script digitally signed and ready to go!
If script signing is part of your PowerShell hardening strategy, reducing friction matters. The easier the process becomes, the more likely it is to be used consistently.
Give it a try, grab the extension from your preferred marketplace and let us know what you think!